[How-To] Build your own Homelab – Part 2
In this installment, I will walk you through the initial steps of configuring the basic infrastructure required for my nested vSphere homelab with NSX and Tanzu. If you’re curious about my motivation and the hardware used for this setup, please refer to Part 1 of this series. Apologies for the delay between posts; I appreciate your patience.
Preparing the Physical Host
After assembling the hardware detailed in Part 1, the initial setup involved configuring the physical host:
- If the system has IPMI (Intelligent Platform Management Interface), activate it and assign an IP. This step streamlines management; refer to the system documentation for instructions. For my Supermicro system, I obtained a DHCP IP and accessed it with the admin password, found on a sticker on the motherboard.
- While in the BIOS, ensure that all hardware is detected, such as RAM, CPUs, PCIe devices, etc. Address any missing components by reseating or testing on an alternative platform if possible.
- Adjust power and thermal settings in the BIOS. Experiment with these settings based on your preferences.
Enable virtualization support in the BIOS, such as Intel VT-x, AMD-V, or SVM, depending on your system. If you plan to passthrough hardware like storage, also enable Intel VT-d or AMD IOMMU, depending on your motherboard’s terminology.
With BIOS settings configured, I proceeded to install ESXi. This can be done through IPMI or a USB stick. I opted for IPMI, and the installation process is standard; I won’t delve into details here.
Once the installation is complete, set up the network on the host, either directly or through remote console. Several decisions need consideration at this stage:
- If you lack a DNS server, consider using your router temporarily.
- Decide which network to assign to the host, whether in the default VLAN (home network) or a dedicated network with nested ESXi. Ensure routing capabilities between these networks.
Now, the ESXi host should be accessible by entering its IP into a browser.
Network Setup
Whether placing the physical and nested ESXi in the normal network (e.g., 192.168.1.0/24) or another, a mechanism for creating and routing VLANs is needed, such as a Layer 3 switch or a router. Options include:
- Using an existing robust router (e.g., Ubiquiti Edge Router, Unifi Dream Machine, Mikrotik CSR series) for your entire network.
- Employing a Layer 3 (or at least Layer 2+) switch in your lab that can route between VLANs.
- Installing a router in front of your lab, maintaining isolation from your existing network.
- Deploying a virtual router in your lab, such as pfSense, opnsense, vyos, etc.
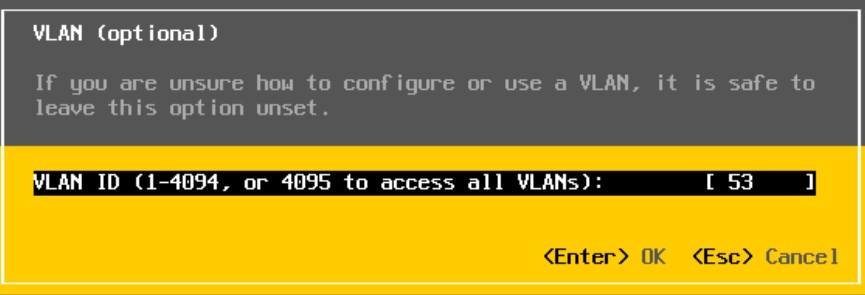
Regardless, network creation is essential. In my case, I established these networks on my Aruba switch:
| Network | VLAN | Network |
|---|---|---|
| Management (optional) | 53 | 10.80.53.0/24 |
| NSX TEP | 101 | 10.80.101.0/24 |
| NSX Edge | 102 | 10.80.102.0/24 |
Set a gateway, either an interface IP (for a switch) or a router gateway. I set mine to .1 or .254, depending on preference.
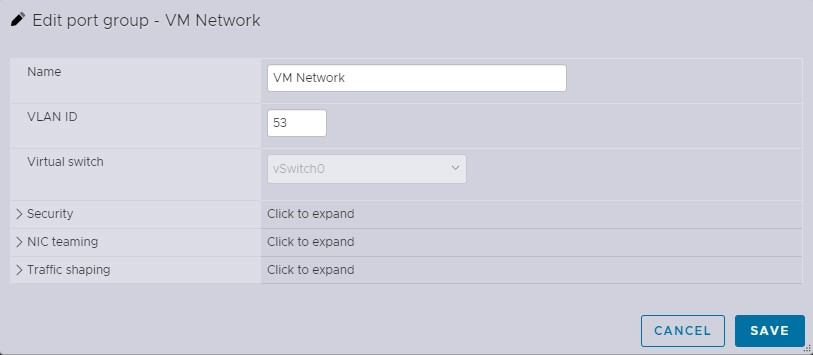
The optional management network provides complete isolation for the lab. I utilize tagged switchports, setting the VLAN on my physical ESXi host in the network settings.
For DNS, vCenter, etc., I set the VM Network on the host to this management network:
 DNS Setup
 DNS Setup
To install vCenter, a DNS server is essential. Options include Windows DNS, bind9, PowerDNS, etc. I opted for a Windows Core Server, avoiding the GUI and installing a small Windows Server 2022 with 2 vCPU and 4GB of RAM.
Now, the question is where to install these VMs. As shared storage isn’t set up yet, I install them locally on the physical host. Considering ESXi is on a 1TB NVMe disk, with the installation size not exceeding 138GB, there’s sufficient space for VMs like DNS and potentially even vCenter.
Configure the VM as usual, and choose a familiar DNS. I also installed an optional Active Directory.
After setting up DNS, create forward- and reverse-lookup zones for your management network. The forward zone is your chosen domain, and the reverse zone, in my example, is 53.80.10.in-addr.arpa. Add at least one entry for your future vCenter, including a pointer.
vCenter Installation
Similarly, install vCenter on the host as usual. Choose the available network (VM Network) and local datastore. Ensure the entered IP and hostname match the DNS entry to prevent errors in the vCenter setup.
Verify that vCenter starts correctly and log in. The next steps involve configuring networking, installing nested ESXi hosts, and later installing NSX and Tanzu on those hosts, which will be detailed in the next part of this blog post.


Leave a Reply