
[How-To] vSAN Snapshot Service Appliance for vSAN Data Protection
VMware released with vSAN 8 Update 3 the data protection feature which enables based on the tremendous power of ESA’s snapshotting engine an all new levels of data protection and agility. Data Protection for vSAN ESA will allow administrators to easily protect and recover VMs against accidents such as errant VM deletions, as well as malicious activities such as ransomware attacks.

Deployment of the appliance
To enable the new feature you need to download the appliance from Broadcom and deploy it as OVA on the vCenter. The deployment process is documented here. And yes – the documentation is very short and I think it is not as clear as we are used to from VMware. Preparation is key – and DNS too!!
IMPORTANT: If you use custom certificates on your vCenter you need to keep on reading carefully. There is a known issue during deployment!
During the deployment of the appliance you need to provide the trusted root vCenter server certificate.

This can be found on the vCenter welcome page https://yourvcenterfqdn

When downloaded the ZIP you need to go to the folder \certs\lin and export your root certificate including the BEGIN and END CERTIFICATE strings. If you have several certificate you can check them in the folder \certs\win by double-klicking them on a windows system.
Make sure you got the right one before hitting deploy!
When the deployment is successful you should see within 2 minutes that a new vCenter plug-in is deployed. If not you need to troubleshoot what went wrong. This is not documented at all!
Troubleshooting
First you need to connect per SSH to the appliance and open the “firstboot” log file. The configuration of the appliance is done by the script firstboot.sh.
less /var/log/firstboot
When checking the logs you will see at the end that the DNS is resolved wrong. The script exported the wrong attribute from the custom certificate we provided. The expected values was the FQDN of the vCenter appliance but it got the eMail address of our engineer who created the certificate.

To fix is quite easy. We need to modify the firstboot script
sudo vi /etc/vmware/cap/cap-firstboot.sh
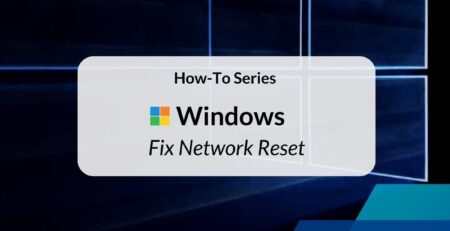
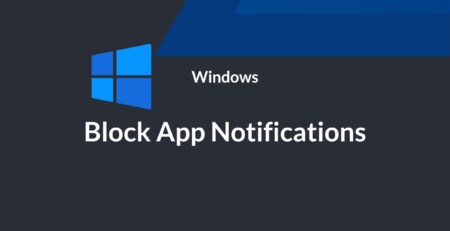
Now on line 32 we modify the value by hardcoding the vCenter FQDN.
Before modification
After modification

Before running the script we need to make it executable
chmod +x /etc/vmware/cap/cap-firstboot.sh
Lastly we run the script
sudo /etc/vmware/cap/cap-firstboot.sh
Within a few seconds you will see the plugin being deployed on your vCenter.
This blog post is related to the appliance version 24057802. File name is “snapservice_appliance-8.0.3.0-24057802_OVF10.ova”


Comments (3)
Hello all, I tried to deploy appliance based on this “manual” with no luck, maybe I am wrong, but on that line 32 should be vCenter FQDN instead of snap appliance. After change it works . Thanks anyway for this helpful procedure. VMware should bit improve deploy process, or at least his procedure “how to”, too short and incomplete from my perspective. Thank you
Yes, you are right. I updated the post.
Hi,
Thanx for the info. I managed to deploy with your fix.
The newest version snapservice_appliance-8.0.3.1-24755667 has some other problem. No luck with that one…
/Jonas