[How-To] Secure your DMZ with a proxy
How to secure your DMZ with a proxy. Security is becoming ever more important. Securing the on-premise infrastructure is a top priority for many of our customers and we’re here to help. Today we’re going to tell you all about how to secure your DMZ with a proxy.
How-To use a proxy for LDAP, NTP and DNS
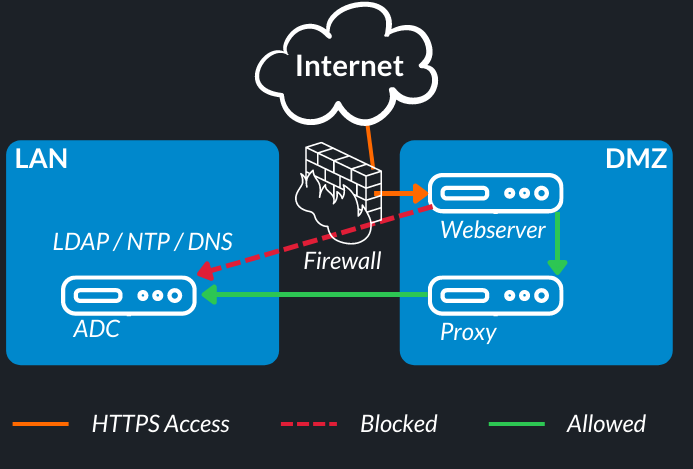
It is important that used ports are not opened across the board for all systems in order to seal off a DMZ. One common challenge is that when domain users want to log on to the DMZ, they cannot access the Active Directory servers.
The answer is to install a proxy server that forwards the queries coming from the DMZ. That applies to the NTP, DNS and LDAPS protocols.
To keep the DMZ isolated, ports 53 (DNS), 123 (NTP), 636 (LDAPS) and 3268-3269 (LDAP GC) are opened by the proxy to the Active Directory servers. All other systems in the DMZ are being served by the proxy server.
To set up the whole thing, you need a Linux system that serves as a proxy. The required services are installed and configured on it. Here we have used a current RedHat Enterprise Linux 8.
Because certain tools are no longer included in the base distribution, they have to be obtained from the opensource community.
OpenLDAP
OpenLDAP is used for proxying the LDAP queries. It can be obtained at https://ltb-project.org/ .
The configuration looks in our case as follows.
/usr/local/openldap/etc/openldap/slapd.conf
### Schema includes ###########################################################
include                 /usr/local/openldap/etc/openldap/schema/core.schema
include                 /usr/local/openldap/etc/openldap/schema/cosine.schema
include                 /usr/local/openldap/etc/openldap/schema/inetorgperson.schema
include                 /usr/local/openldap/etc/openldap/schema/misc.schema
include                 /usr/local/openldap/etc/openldap/schema/nis.schema
include                 /usr/local/openldap/etc/openldap/schema/microsoft.minimal.schema

## Module paths ##############################################################
modulepath              /usr/local/openldap/libexec/openldap
moduleload              back_ldap
moduleload              rwm

# Main settings ###############################################################
pidfile                 /usr/local/openldap/var/run/slapd.pid
argsfile                /usr/local/openldap/var/run/slapd.args

### Database definition (Proxy to AD) #########################################
database                ldap
suffix                  "DC=sample,DC=intra"
rootdn                  "cn=ldap,DC=sample,DC=intra"
rootpw                  "BIND-PW-PROXY"
readonly                yes
protocol-version        3
rebind-as-user          yes
uri                     "ldaps://ADC001,ldaps://ADC002"
idassert-bind bindmethod=simple
    binddn="CN=svc-ldap,OU=Service_Accounts,DC=sample,DC=intra"
    credentials="BIND-PW-AD"
    mode=none
    flags=non-prescriptive
    tls_reqcert=never
    tls_cacert=/usr/local/openldap/etc/openldap/CA.cer  # AD Certificate
overlay                 rwm
rwm-map                 attribute       uid     sAMAccountName

### Logging ###################################################################
loglevel                0

### Limits ####################################################################
sizelimit               unlimited

### LDAPS ####################################################################
TLSCACertificateFile /usr/local/openldap/etc/openldap/CA.cer # PKI CA Certificate
TLSCertificateFile /usr/local/openldap/etc/openldap/proxyldap001.cer # LDAP Proxy Certificate
TLSCertificateKeyFile /usr/local/openldap/etc/openldap/proxyldap001.key # LDAP Proxy Key
When the configuration has been created, the service can be started. A test can be made directly on the proxy.
[root@localhost]# ldapsearch -LLL -x -h localhost -b "DC=sample,DC=intra" -D "cn=ldap,DC=sample,DC=intra" -w "BIND-PW-PROXY" "(objectClass=USER)"
The output should now return all user objects of the AD.
NTP
To use Windows as source for the Linux Chrony service, the NTP service must be adapted on the Windows domain controllers. Else Chrony cannot trust the NTP servers.
Tasks on Windows
First, a CMD must be started as administrator. Then simply execute the following commands.
w32tm /config /manualpeerlist:"0.ch.pool.ntp.org,0x8 1.ch.pool.ntp.org,0x8 2.ch.pool.ntp.org,0x8 3.ch.pool.ntp.org,0x8" /syncfromflags:manual /reliable:yes /update
w32tm /resync /rediscover
w32tm /config /LocalClockDispersion:0
w32tm /config /update
net stop w32time && net start w32time
Configuration on Linux
To use Linux as NTP proxy, you can simply use Chrony, which is included with RedHat. The configuration only has to be adjusted and the service has to be started afterwards.
/etc/chrony.conf
# These servers were defined in the installation: (Active Directory)
server 192.168.46.100 trust
server 192.168.46.101 trust
# Use public servers from the pool.ntp.org project.
# Please consider joining the pool (http://www.pool.ntp.org/join.html).

# Record the rate at which the system clock gains/losses time.
driftfile /var/lib/chrony/drift

# Allow the system clock to be stepped in the first three updates
# if its offset is larger than 1 second.
makestep 1.0 3

# Enable kernel synchronization of the real-time clock (RTC).
rtcsync

# Enable hardware timestamping on all interfaces that support it.
#hwtimestamp *

# Increase the minimum number of selectable sources required to adjust
# the system clock.
#minsources 2

# Allow NTP client access from local network. (DMZ)
allow 10.10.10.0/24

# Serve time even if not synchronized to a time source.
local stratum 5

# Specify file containing keys for NTP authentication.
keyfile /etc/chrony.keys

# Get TAI-UTC offset and leap seconds from the system tz database.
leapsectz right/UTC

# Specify directory for log files.
logdir /var/log/chrony

# Select which information is logged.
#log measurements statistics tracking
To test, you can query the sources.
[root@localhost]# chronyc sources
MS Name/IP address         Stratum Poll Reach LastRx Last sample
===============================================================================
^* 192.168.46.100                  2   6     1     9    +76us[  +76us] +/-   32ms
^  192.168.46.101                  4   6     1     9   +206us[ +206us] +/-   29ms
DNS
We use the ISC BIND service as DNS server. This is available for all current Linux distributions and can be configured easily.
Forwards can be easily configured for this purpose.
/etc/named.conf
options {
        listen-on port 53 { 127.0.0.1; 10.10.10.200; };
        directory       "/var/named";
        dump-file       "/var/named/data/cache_dump.db";
        statistics-file "/var/named/data/named_stats.txt";
        memstatistics-file "/var/named/data/named_mem_stats.txt";
        allow-query     { localhost; 10.10.10.0/24; };

        forwarders {
            192.168.46.100;
            192.168.46.101;
        };

        recursion yes;

        dnssec-enable no;
        dnssec-validation no;

        auth-nxdomain no;
        managed-keys-directory "/var/named/dynamic";

        pid-file "/run/named/named.pid";
        session-keyfile "/run/named/session.key";
};

logging {
        channel default_debug {
                file "data/named.run";
                severity dynamic;
        };
};
After starting the service, queries can be made via DNS.
[root@localhost]# nslookup ADC001
Server:         127.0.0.1
Address:        127.0.0.1#53

Non-authoritative answer:
Name:   ADC001.sample.intra
Address: 192.168.46.100
Linux Firewall
To enable the systems in the DMZ to use the services, the Linux firewall must be opened accordingly.
firewall-cmd --add-service=dns --permanent
firewall-cmd --add-service=ntp --permanent
firewall-cmd --add-port=123/udp --permanent
firewall-cmd --add-port=636/tcp --permanent
firewall-cmd --reload
Summary
After configuring these three services, you have a working proxy that can answer NTP, DNS and LDAPS queries within the DMZ, and you don’t have to loop all systems through the firewall.
If you want to take your security to the next level, don’t hesitate to contact us and we’ll gladly help you make your IT infrastructure secure.


Leave a Reply